Make no doubt about it: if you stick a plastic bag full of wet greens into your refrigerator, they won’t keep long. Very quickly, they’ll start rotting. Especially if they’re as delicate and tender as the baby lettuces. Yet this is what many folks do when they get their veggies home from their pickup sites. If you prepare your leafy greens properly, however, they will easily keep for the week (until you are re-supplied, in other words!). I know sometimes you don’t have time to deal with them the day you pick up, so if not, hopefully within a day or so you can pull them out and ‘prep’ them, as I’m going to describe below, without them being much the worse for wear.
If your time is limited, select the most delicate greens to prep, like the bagged baby lettuces. The more tender the leaf, the more delicate its constitution, and the more susceptible it is to rot.
Here are the types of greens I will prep in this fashion:
– baby lettuces
– arugula
– tatsoi
– mizuna
– mustard greens
– spinach
– radish greens (yes, you can eat them! they make a good cooking green)
And the tools I use:
– a big bowl or a sink
– a salad spinner (if you don’t have one, I have a tip)
– cotton floursack towels (or any towel will do)
– clean, dry plastic bags (I’ve used Evert-fresh bags to good success; you can find them in catalogers such as Real Goods, but they are not a requirement)
The larger and hardier bunched greens such as kale, collards, chard, and even mei qing choi I do a little differently (they’re eaiser). I’ll cover them briefly below, but let’s get back to the delicate leafies:
In a basin or sink, put each batch of greens (I do them one at a time) and add enough water so you can swish them around reasonably freely. Swish them around good, and then pick them out, in handfuls or individually if you like, inspect them for dirt, pinch off any root ends or broken stems (in the case of spinach, I pinch off most of the stem, saving the leaves), and remove any weeds or leaves which are yellowed, transferring the select greens into your salad spinner.

Sometimes you will find bonus goodies in your greens! In last week’s tatsoi, I had some red mustard greens. And a weed or two.
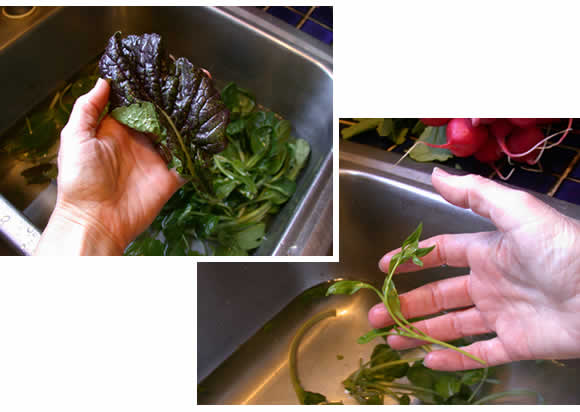
Spin the greens well (spin, pour out the water, spin again, and repeat, until you’re not getting more water in the bottom of the spinner). Then spread them out on a clean towel out of the sun and allow to air dry while you prep your next batch of greens. A few drops of moisture here and there are not the end of the world, but they should be 95% or better dry before you bag them.
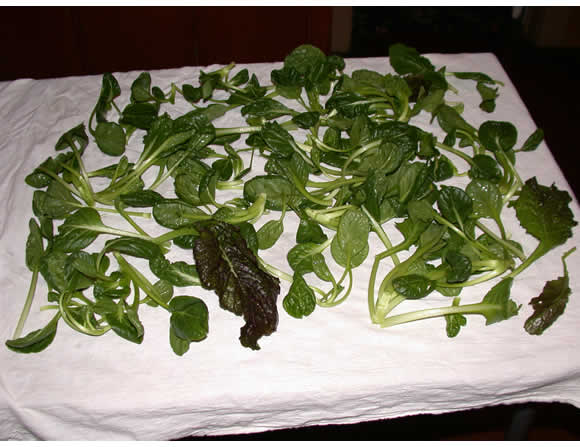
Transfer greens to a plastic bag, gently squeeze or suck out the air (like the reverse of blowing up a balloon), and tie with a twisty-tie. These are now good to go! You will now have a bag of fabulous fresh greens all washed and ready to go, which you can grab and use, without worry of dirt or bugs or weeds or rot.
Shortcut: if you don’t want to wait for your greens to dry, you can roll the greens up, towel and all, and put them into a plastic bag overnight. By the next day, the towel will have absorbed the moisture and you can decant them back into the bag, removing the towel. (Don’t store them in the towel too many days this way, as they’ll go limp. Still good to cook with, but if you wanted a fresh salad, you’d have to perk them up in water, spin and dry again before using.)
No-salad-spinner tip: I learned this from a cookbook called “Soup and Bread” by Crescent Dragonwagon. Put your washed greens into an old pillowcase and (go outside to do this!), swing the bag around wildly over your head or around in the air like a lasso, and the water will ‘spin’ out.
Storing the hardier bunched greens (kale, collards, chard, mei qing choi)
As I said, these are easier. I typically don’t wash them until I’m ready to use them (and sometimes not even then, if upon inspection there are no signs of dirt or aphids!). But I do let them air dry on a towel as I’m sorting through my bag of goodies and prepping other stuff before bagging and putting into the fridge. When mostly dry, then put them into a bag, squeeze the air out, etc. and refrigerate. You can use the same shortcut for these as the other greens, i.e. if you’re in a hurry and the bunched greens are wet, wrap them in a towel and stick them in a bag (or your crisper drawer) overnight to absorb the extra moisture, then transfer them to a bag the following day
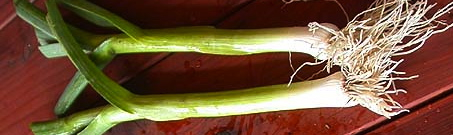
This still stumps people, and it is easy to see why. They look so similar! Okay, that’s an understatement; the leeks and green garlic are undistinguishable visually. The onions are the easiest to tell from the others, as the green part of the stalk is tubular and hollow. The green part of the garlic and leeks both form the same “V” shape when cut crosswise, and the leaves of both have a kind of left-right fan structure, so that’s no help either. You have to use your nose. Scratch ‘n’ sniff. The green garlic will smell like garlic. But take comfort in the fact they are all in the same family (the alliums), so in a lot of cases if you accidentally ended up using ‘the wrong one’ in a recipe [potato-green garlic soup instead of potato-leek soup, for example], it is not like you will suddenly have something inedible! It may be different, but will taste just fine.

This is Green Garlic…
…and this is also Green Garlic.

These are Spring Onions…
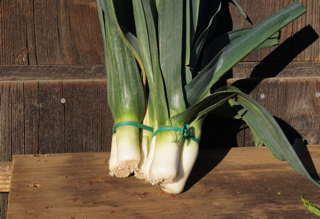
…and these are leeks. Notice how the leaves flair out closer to the bottom compared to the garlic above.
First, evaluate the tenderness of the greens you’ll be using – on the tougher/firmer end of the scale, we have collards and Lacinato (Dino) kale. In the middle are Red Russian kale and beet greens (and greens from veggies like rutabagas), then next maybe chard. On the tender end are things like spinach, mustard greens, radish greens and arugula.
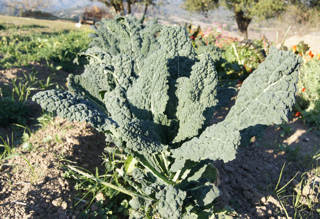
Lacinato Kale in the field.
Generally speaking the tougher/firmer greens will want a longer cook time and the more tender ones a shorter. Cooking time (and technique) also affects the texture of your cooked greens: some folks like their greens al-dente, others silky soft. There are always exceptions to rules (okay, almost always), but if you want somewhere to start, this will get you going!

Rainbow Chard in the field.
Basic technique: boiling
Best for the firmer greens: collards, kale, beet greens. I wouldn’t boil spinach, mustards, or arugula… I might boil chard. Bring a pot of well-salted water to a boil. Wash greens as needed to remove dirt and the occasional bug, then strip greens from stems (grasp stem in one hand, slide leaf through the grasp of your other hand and strip them off – this is MUCH easier than trying to cut the leaves from the stems with a knife!). No need to chop before boiling! (I’ll talk more about this below.) Drop leaves into boiling salted water, turn heat down to medium-ish – it just needs to simmer it doesn’t have to be a roiling boil – and cook 3-5 minutes. (Quantity affects cooking time too, so if you’re doing a larger amount, like a couple bunches at once, it may take a little longer. 3-5 minutes is fine for one bunch of kale or collards.) A longer boil time will make the greens more tender and soft. If you like them firmer, don’t cook them as long. Over time you’ll come to learn what you like best!
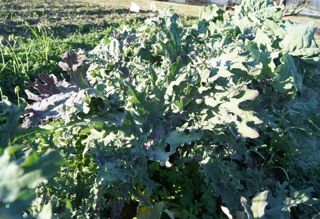
Red Russian Kale in the field.
A note re: pot-size – greens cook WAY down in volume, so you don’t need a giant pot (though at the start it may look like you will). Just add the greens a handful at a time if they won’t fit all at once, and they will quickly wilt and make room for the rest.
Once the greens are cooked to your liking (you can always fish a piece out and try it, just like you would with pasta), drain them well, squeezing out the water by pressing them with a wooden spoon against your colander, then plunk them onto a cutting board. NOW chop them. I find it is WAY easier to chop the greens after cooking than before. If you do it before, you’re working with a large unwieldy pile and have pieces going everywhere; afterwards, however, you have a nice manageable clump which can be chopped as coarsely or finely as you like. This is SO MUCH EASIER.
Basic technique: steaming.
Steaming is great for the delicate greens like spinach. It works fine for the firmer greens too, although I find kale cooked this way to be a little less tender (if you want that ‘silky’ feel, boiling works best). But if you like this al-dente-ness in kale, it’s a great way to go – uses less water, and some say less nutrients are lost because the greens are not immersed in water. I don’t know enough about this fact to say.
The steps for steaming are essentially the same as for boiling, above, except I will sprinkle salt onto the leaves since they’re not immersed in salted water. FYI the salt sticks better if the leaves are a little wet (clinging water from washing is fine, otherwise sprinkle a little in).
Basic technique: sauteing.
Most recipes for sauted greens include other ingredients and the sauteing instructions are a part of the overall recipe, but if you ever want to make plain sauted greens, it’s easy. In this instance, you WILL want to chop your greens before cooking (so it’s a little messier in prep). The most important thing to remember here is that the greens will need moisture – you don’t want to dry-saute them or they come out tough. Water clinging to leaves after washing is usually sufficient moisture. Just heat a skillet or wok with a little oil, then add greens and stir-fry. You can turn heat to medium and put a lid on it for a few minutes (which is essentially steaming them), or continue to stir-fry and watch, adding a splash of more water if it gets too dry.